배경
CropMon의 다음 스텝에 대한 고민과 함께 어떻게 하면 확장성 있는 좋은 구조를 만들지를 살펴보고 있다. 플러그인/익스텐션에 대한 자료를 찾아보던 중 문득 내가 많이 사용하고 있는 에디터인 VSCode Extension 이야 말로 훌륭한 레퍼런스가 아닌가 하는 생각이 들었고 겉핥기라도 한번 알아보면 도움이 될 것 같았다.
전체 내용은 여기(labs/vscode-internal)에 정리해뒀고 몇가지만 요약해본다.
실행
코드 빌드 및 실행
일단 VS Code 를 받아서 실행해보자
# 코드 클론
$ git clone https://github.com/microsoft/vscode.git

$ cd vscode

# 패키지 설치
$ ./scripts/npm.sh

# 빌드
$ ./scripts/npm.sh compile

# 빌드 (파일 변경 감지)
$ ./scripts/npm.sh watch

# 앱(code) 실행
$ ./scripts/code.sh
VS Code 로 실행
바로 실행할 수 있는 Launch Configuration (`.vscode/launch.json`) 도 준비되어있다. `VS Code` 설정으로 실행하면 된다.

디버깅으로 코드 트레이싱
원하는 곳에 Break Point 를 걸어서 브레이크가 잘 걸리는지 보자. 이걸로 코드 트레이싱을 할 준비는 완료.

코드 구조 파악
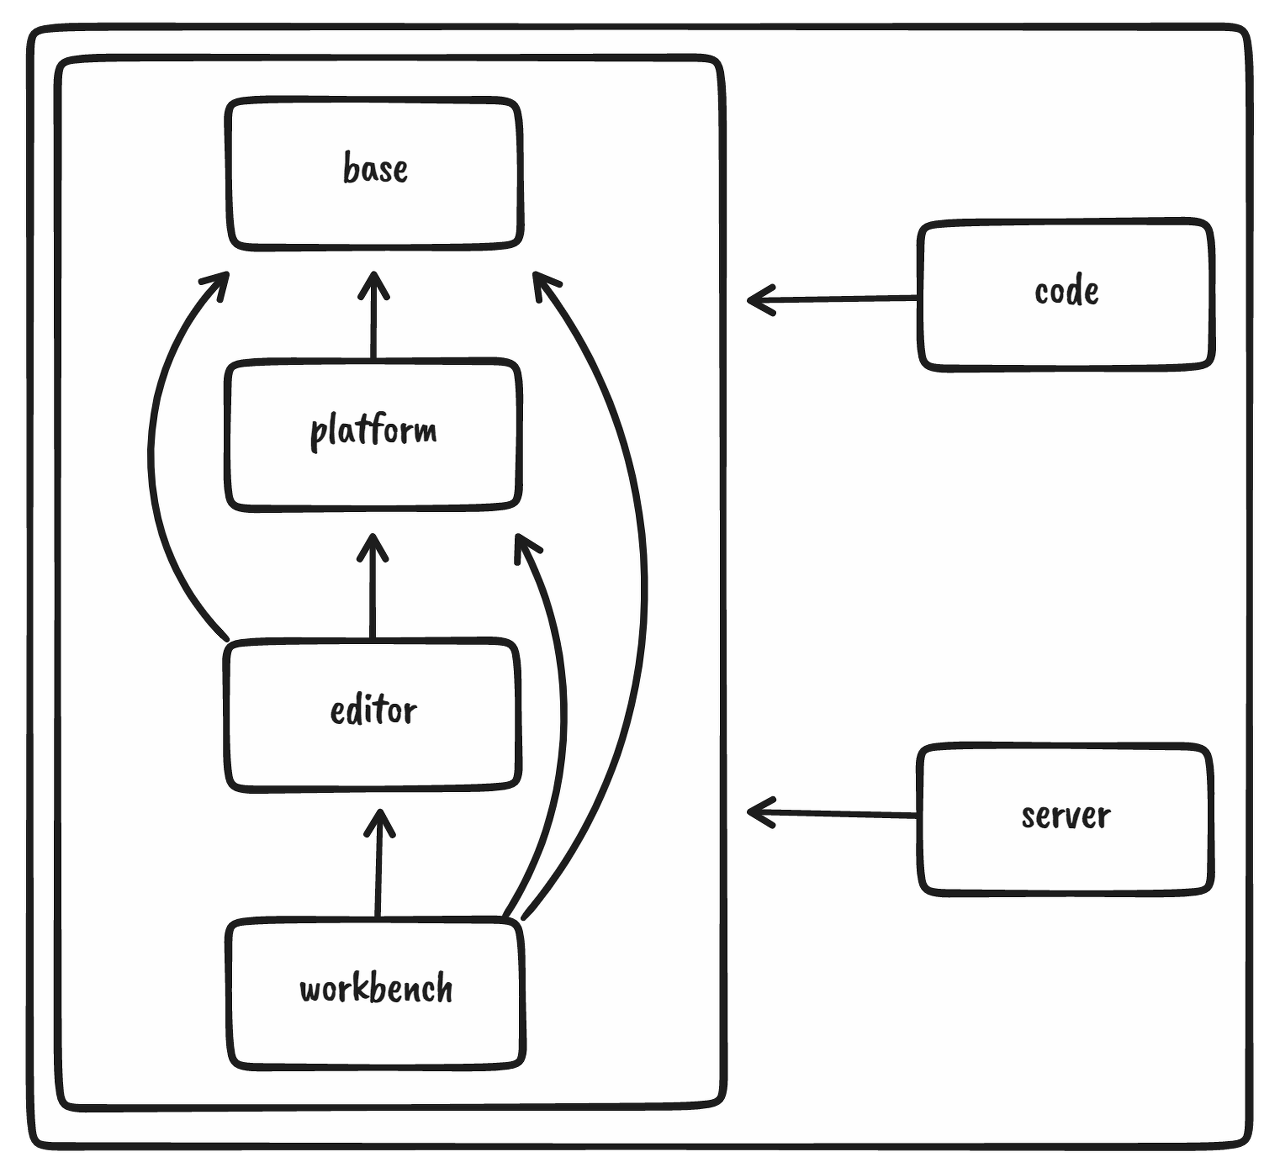
최상위 컴포넌트

base
공통적으로 사용할 유틸리티들과 UI 빌딩 블럭들을 제공하며, 이들은 다른 레이어에서 사용(참조)됨
platform
서비스 주입(injection) 관련 지원과 workbench 및 code 같은 레이어에서 공유되는 기반 서비스들을 정의하고 있음. editor 또는 workbench 관련 서비스 및 코드들을 포함하면 안됨
editor
별도로 다운로드가 가능한 에디터인 "Monaco" 라고 알려져있는 컴포넌트
workbench
다양한 에디터(Monaco, notebooks, custom editor)들을 호스트하면서 여러 패널(Explorer, Status Bar, Menu Bar, ...)을 위한 프레임워크를 제공. 또한, 이 레이어에서는 Electron 을 이용하여 VS Code 데스크탑 버전을 구현하며 브라우저 API를 이용하여 VS Code 웹버전도 제공하고 있음
code
데스크탑 어플리케이션의 진입점(entrypoint)
server
원격 개발(Github codespaces, vcode.dev)을 위한 VS Code 서버 어플리케이션의 진입점
컴포넌트 의존 관계

익스텐션 만들기
간단한 익스텐션을 하나 만들면서 익스텐션 개발자 관점에서는 어떤걸 제공해줘야하는지 어떤 필수 요건들이 필요한지 등을 살펴보자.
샘플 익스텐션 (QuiCLI)
에디터 본문에서 현재 커서에 위치한 라인의 Shell Command 를 추출하고 이를 Terminal 에서 실행해주는 간단한 익스텐션이다. VS Code Extension 탭에서 `QuiCLI` 를 검색하거나 마켓플레이스를 통해서도 설치 가능하다. 소스코드는 여기에 있다.

보일러플레이팅
더 구체적인 가이드는 Your First Extension 을 참고하면 좋다.
$ npm install -g yo generator-code

$ yo code

# ? What type of extension do you want to create? New Extension (TypeScript)
# ? What's the name of your extension? HelloWorld
### Press <Enter> to choose default for all options below ###

# ? What's the identifier of your extension? helloworld
# ? What's the description of your extension? LEAVE BLANK
# ? Initialize a git repository? Yes
# ? Bundle the source code with webpack? No
# ? Which package manager to use? npm

# ? Do you want to open the new folder with Visual Studio Code? Open with `code`
익스텐션 구현 (오버뷰)
익스텐션의 진입점(Entrypoint)는 `activate` 이다. 이는 `package.json`의 `activationEvents`에서 정의한 시점에 호출된다. QuiCLI 익스텐션에서는 이 시점에 커맨드 팔레트(Cmd+Shift+P)에서 실행할 수 있게 `commands.registerCommand` 를 통해 등록한다. 커맨드 핸들러에서는 `window.activeEditor` 를 통해 현재 라인의 커맨드를 추출하고 `window.createTerminal` 을 통해 생성된 터미널 객체를 통해 명령을 보내 실행토록한다.
커맨드에 대한 Manifest 설정으로는 `package.json`의 `contributes.commands` 를 통해 정의한다. 더 자세한 익스텐션 종류 및 기여 포인트(Contribution Point)도 있으니 참고하자.
// @src/extension.ts
import { ExtensionContext } from 'vscode';
import { ShellCommandExtracter } from './extracter';
import { CommandHandler, TextEditorLineGetter } from './handler';

export function activate(context: ExtensionContext) {
  new CommandHandler(
    context,
    new ShellCommandExtracter(new TextEditorLineGetter())
  );
}

// This method is called when your extension is deactivated
export function deactivate() {}
// @src/handler.ts
import { ExtensionContext, Terminal, commands, window } from 'vscode';
export class CommandHandler {
...
constructor(
private context: ExtensionContext,
private commandExtracter: ICommandExtracter,
) {
const handlerMap = {
'quicli.runCommandInTerminal': this.onRunCommandInTerminal,
};
Object.entries(handlerMap).forEach(([command, handler]) => {
const disposable = commands.registerCommand(command, handler);
this.context.subscriptions.push(disposable);
});
}
private onRunCommandInTerminal = (_args: any[]) => {
const command = this.getCommandOnCursorLine();
const term = this.getDedicatedTerminal();
term.sendText(command, true);
term.show(true);
};
...// @src/extracter.ts
export class ShellCommandExtracter implements ICommandExtracter {
...
private getCursorLineNumber = (): number | undefined => {
const activeEditor = window.activeTextEditor;
if (!activeEditor) {
return undefined;
}
return activeEditor.selection.active.line;
};
private getDedicatedTerminal = (): Terminal => {
if (this.terminal && !this.terminal.exitStatus) {
return this.terminal;
}
const name = TERMINAL_NAME;
this.terminal = window.terminals.find(t => t.name === name);
if (!this.terminal) {
this.terminal = window.createTerminal(name);
this.context.subscriptions.push(this.terminal);
}
return this.terminal;
};
}// @package.json
{
"name": "quicli",
"displayName": "QuiCLI",
"description": "Run shell command on the fly",
"version": "0.0.3",
"repository": {
"type": "git",
"url": "https://github.com/sangwonl/vscode-extension-quicli.git"
},
"icon": "assets/icon.png",
"publisher": "gamz",
"categories": [
"Other"
],
"activationEvents": [
"onStartupFinished"
],
"contributes": {
"commands": [
{
"command": "quicli.runCommandInTerminal",
"category": "QuiCLI",
"title": "Run Command in Terminal"
}
]
},
...
익스텐션 패키징 및 배포
익스텐션을 배포하기 위해서는 유효한(등록된) 퍼블리셔 정보가 필요한데, Visual Studio Marketplace 에서 생성 후 package.json`에 `publisher` 필드에 채워주면 된다. 더 자세한건 Publishing Extensions 을 참고.

그런 후에 `@vscode/vsce` 패키지를 통해 패키징 및 배포를 할 수 있다.
$ npm install -g @vscode/vsce
$ vsce package
$ ls
quicli-0.0.4.vsix ...
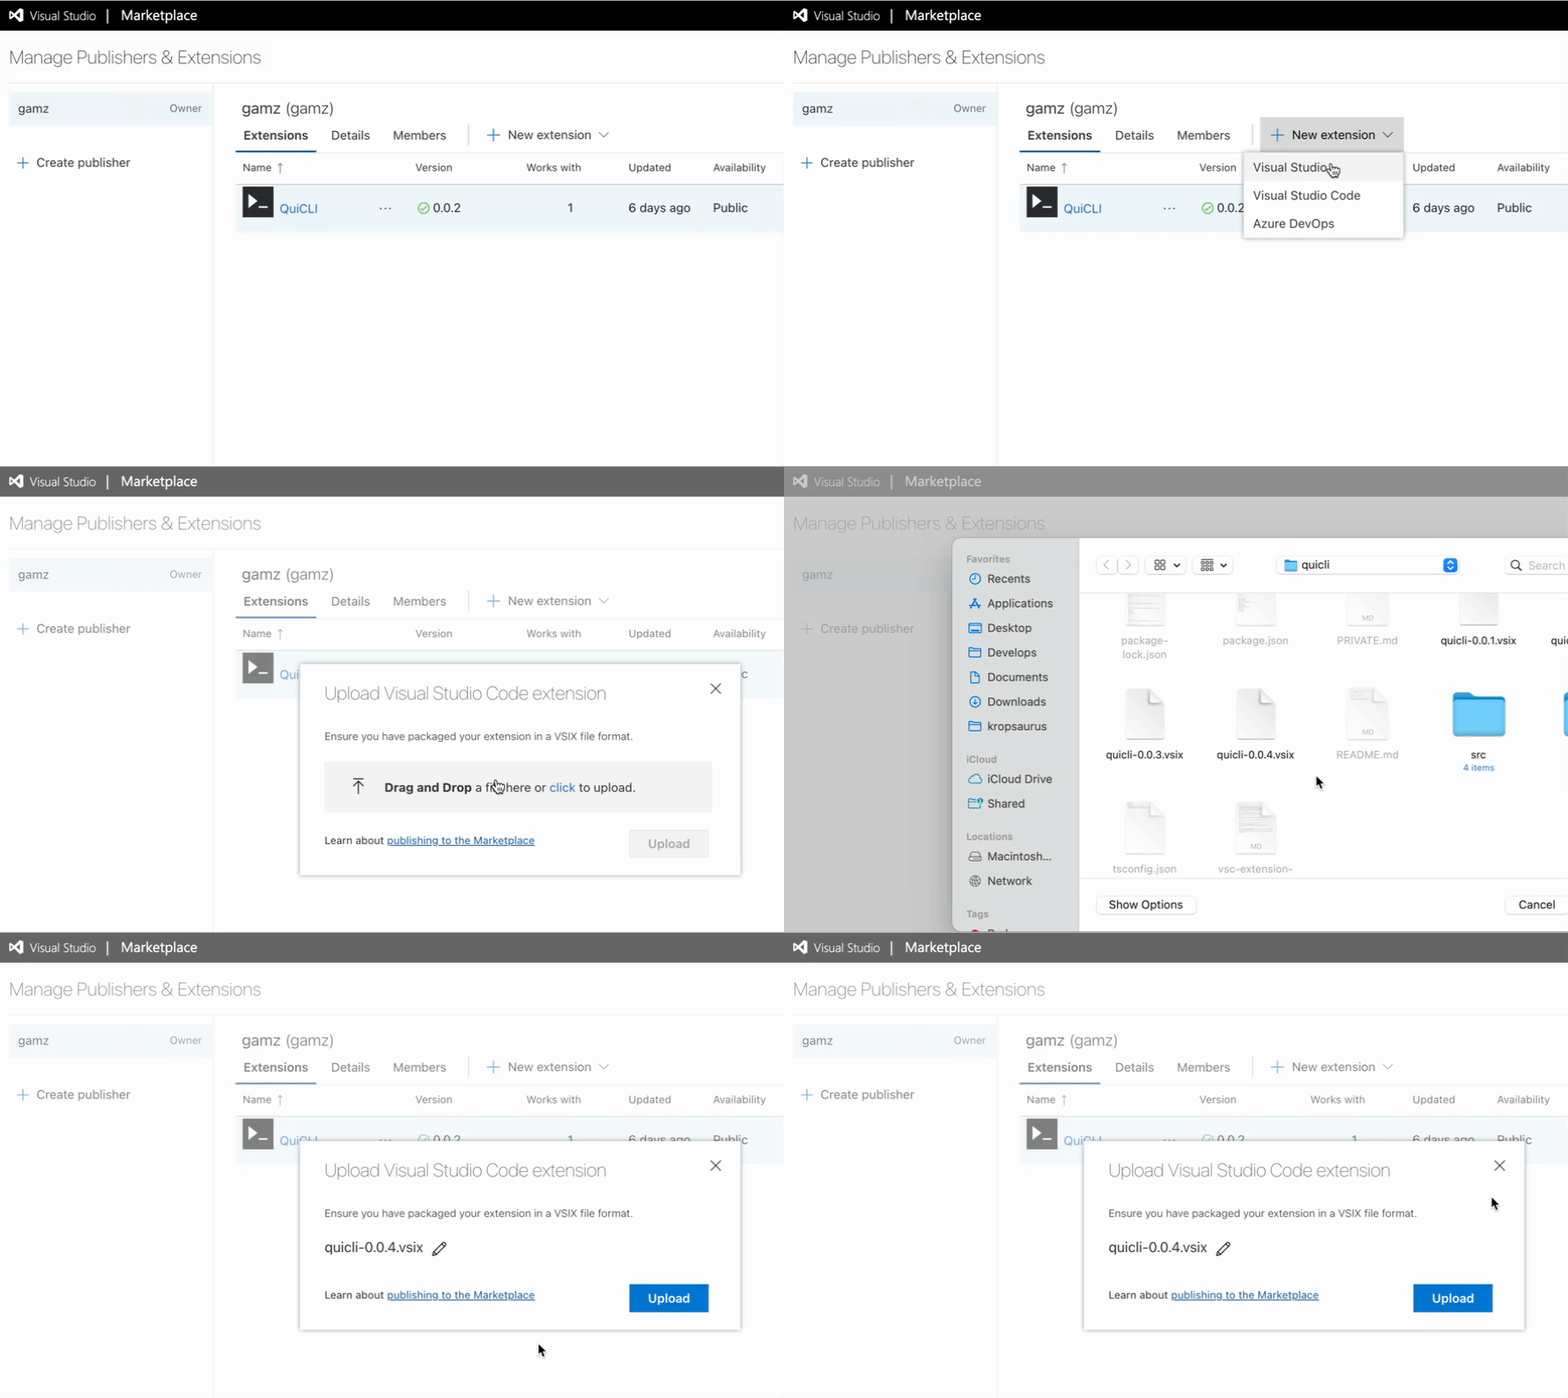
수동 배포

CLI 배포
Azure DevOps 에서 Organization 을 하나 생성하고 다시 Visual Studio Marketplace 로 돌아와 Personal Access Token 을 하나 생성한다.

$ npm install -g @vscode/vsce
$ vsce publish
 INFO  Publishing 'gamz.quicli v0.0.4'...
 INFO  Extension URL (might take a few minutes): https://marketplace.visualstudio.com/items?itemName=gamz.quicli
 INFO  Hub URL: https://marketplace.visualstudio.com/manage/publishers/gamz/extensions/quicli/hub
 DONE  Published gamz.quicli v0.0.4.
익스텐션 로드 및 실행 흐름 분석
VS Code 에는 크게 세개(혹은 추가적으로 그 이상)의 주요 프로세스가 존재하는데 우리 눈에 보이는 UI 나 주요 어플리케이션 로직이 돌아가는 Code Internl Process(launch.json 상의 이름, Browser API 접근이 가능한 ㄸlectron의 renderer에 해당하는 프로세스)와 Node.js 실행 환경으로 호스트 Resource의 접근이 가능한 Main Process, 그리고 익스텐션이 동작되는 Extension Host Process 이다.
코드 트레이싱을 하다보면 중간 중간 IPC를 통해 이 실행 환경이 전환되는데 이 부분을 염두하고 트래킹하는게 의미가 있다. Extension Host Process 가 따로 분리되어있는 이유로는 Internal/Main Process의 동작(퍼포먼스나 보안)에 간섭을 덜 유발시키며, 리모트 환경(Dev Containers, Codespace 등)을 지원하기 위한 구조를 위해서로 보인다.
로드 및 활성화(activate)
초기 실행(bootstrap) 중에 Main Process에서 `ExtensionHostStarter`가 Extension Host Process를 포크(fork)하고 Extension Host Process에서는 필요한 익스텐션 스크립트를 로드 및 활성화(activate 호출)한다.

커맨드 실행
유저가 커맨드 팔레트를 통해 커맨드를 실행하면 해당 커맨드를 등록한 익스텐션이 호출되게 되는데 이 익스텐션을 로드한 Extension Host Process에 IPC/RPC 을 넣어 해당 Extension Host Process 에서 실행되게 한다.

익스텐션 호스트 아키텍쳐
익스텐션 호스트 종류
local UI 와 동일한 머신에서 로컬로 돌아가는 Node.js 기반의 익스텐션 호스트
web UI 와 동일한 머신 브라우저에서 돌아가는 웹 기반의 익스텐션 호스트
remote 컨테이너 처럼 원격으로 돌아가는 Node.js 기반의 익스텐션 호스트
익스텐션 호스트 런타임
Node.js 로컬(local)과 원격(remote) 익스텐션 호스트의 런타임
Browser 웹(web) 익스텐션 호스트의 런타임, 브라우저 WebWorker를 사용
선호하는 로케이션 정의 (extensionKind)
workspace 원격에서 실행되길 선호하는 익스텐션
ui 로컬(UI와 같은 머신)에서 실행되길 선호하는 익스텐션
// @package.json
{
  "name": "wordcount",
  "displayName": "Word Count",
  "version": "0.1.0",
  "publisher": "ms-vscode",
  "extensionKind": ["ui", "workspace"],
  ...
}
익스텐션 개발 환경 제공을 위해 고려해야할 것들
라이프사이클 (activate / deactivate)
훅 (이벤트)
컴포넌트 접근 API
샌드박싱
설치 / 업데이트 / 마켓
'스케일업 > 랩' 카테고리의 다른 글
| ChatGPT와 함께 강화학습 기본 따라하기 (0) | 2025.04.13 |
|---|---|
| 배경 제거(일명 누끼따기) 실험 (1) | 2021.03.28 |
| 벤포드법칙(Benford's Law)과 이미지 (0) | 2021.03.14 |